

Clean cuts in hard plastic need good heat control, vibration control, and the right tool for the cut shape. Hard plastic cracks, chips, or melts if the setup causes chatter or if a blade stays too long and overheats the edge. This guide offers decision steps and workflows for common hard plastics like acrylic, polycarbonate, PVC, and ABS.
A good plan begins with a small test on scrap of the same plastic type and thickness. The test shows if the plastic acts brittle, heat-sensitive, or tough with the chosen tool. Keep the offcuts for future test cuts, or run them through a plastic crusher for recycling if your shop processes plastic waste.
Material factors that determine the cutting plan
Hard plastic cutting results depend on polymer type, thickness, and heat sensitivity, not just tool power. Acrylic chips and cracks with high vibration. Polycarbonate deforms and melts with unmanaged heat. PVC and ABS vary by formula, so test cuts stay the safest check.
Acrylic and polycarbonate differ in surface risks during layout. Acrylic scratches easily. Many sheets come with protective film to stop handling damage. Define a surface protection plan before marking and clamping.
Heat affects most cutting methods. Fast blade speed with slow feed causes melting. Slow feed with vibration triggers chipping. The plan must include a heat control method, like pauses, airflow, or a blade that cuts without melting.
Common mistakes that cause cracks, chips, and melted edges
Most failures in hard-plastic cuts come from vibration, uncontrolled heat, and surface damage before cutting starts. Unsupported areas cause chatter. Chatter starts micro-cracks that turn into visible breaks. Stable support matters more than extra force.
Heat issues often stem from pauses, not quick passes. A stopped jigsaw blade or stalled circular saw tooth melts plastic fast. It then re-welds material behind the blade. Treat heat control as a key process step, not a guess.
Surface damage often comes from the workspace, not the tool. Grit under a sheet leaves scratches that stay after a good cut. Use protective film on acrylic. Add painter’s tape on the cut line when needed. This cuts cosmetic risks during handling and sawing.
Safety, clamping, and surface protection setup
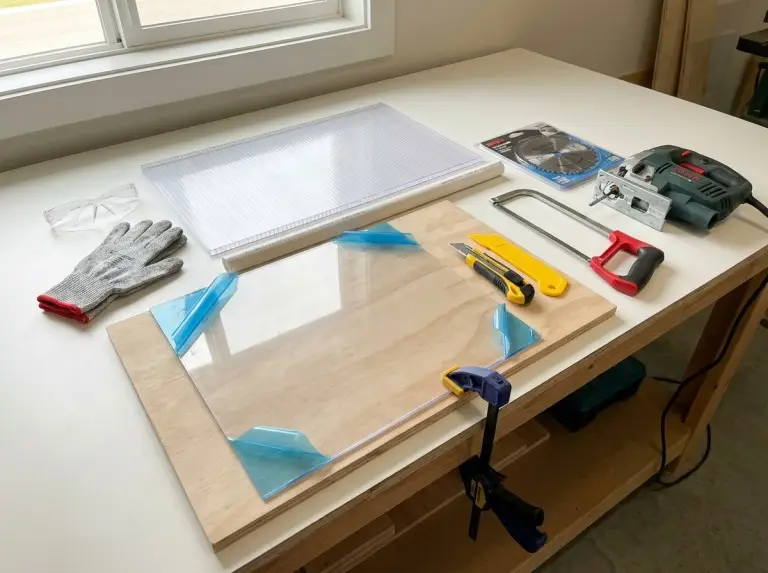
Safe cutting of hard plastic needs eye protection, stable clamping, and ventilation before the blade touches the sheet. Plastic throws shards. It creates fine dust during sanding. It makes fumes when overheated. A stable setup boosts cut quality. It makes vibration easy to measure and control.
Safety and setup checklist
Wear safety glasses and cut-resistant gloves if shards might fly.
Use a dust mask or respirator for sanding or when tools make dust.
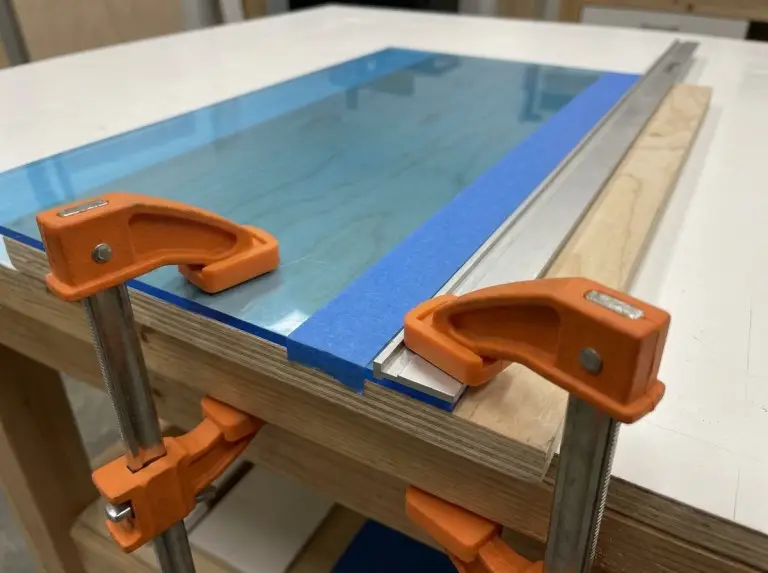
Clamp the plastic to a stable surface. Support both sides of the cut.
Avoid tight clamps that deform or stress the sheet. Use soft jaws if possible.
Make surface protection part of setup. Acrylic sheets often have protective film. Keep it on during marking and cutting if it does not block the cut. Painter’s tape over the cut line reduces chipping on some plastics. It also guards the visible surface.
Main cutting tools for hard plastic and typical uses
Pick tools for hard plastic based on cut shape and the plastic’s chip or melt risk. A stronger tool can give worse results with the wrong blade or support. Include blade type, support method, and heat control in selection.
| Cutting need | Typical tool | Best fit scenarios | Setup notes to verify |
|---|---|---|---|
| Straight cut on sheet with minimal chips | Score-and-snap with acrylic scriber or sturdy knife | Thin acrylic sheet where snapping works | Use straightedge; scribe multiple times with even pressure; score opposite side for cleaner snap in some cases. |
| Straight rip cut on thicker sheet | Table saw or circular saw with plastic-appropriate blade | Long straight cuts on thicker acrylic/polycarbonate | Use blade that reduces melting; check tooth form and spacing from maker or package. |
| Curves and interior shapes | Jigsaw (saber saw) or rotary tool | Curves, cutouts, and non-linear profiles | Reduce vibration with full support; test speed/feed on scrap to avoid melting. |
| Detailed shaping on sheet and small parts | Band saw or rotary tool | Intricate paths and smaller parts | Watch for melting on thicker pieces; check blade choice and feed on scrap. |
| Fast, smooth cuts on some thermoplastics | Heated cutter (thermocutter class) | Controlled melt-cutting on suitable plastics | Treat fumes as main risk; check ventilation and polymer fit before use. |
Cutting workflows for straight cuts, curves, and openings
A good cutting workflow uses marking, support, and controlled feed to handle heat and stop cracks. Each method needs a success check, like no edge whitening, no melted bead, or no chipped corner. Workflows cut rework. They make finishing predictable.
Score-and-snap workflow for acrylic sheet
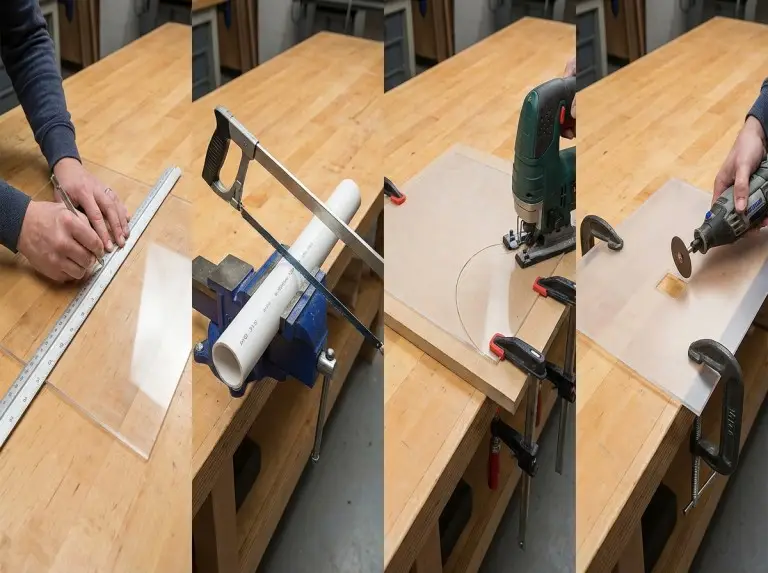
Score-and-snap gives clean straight edges on thin acrylic if the scribe line is deep and even. Place the sheet on a flat surface. Mark the cut line. Align a straightedge on it. Use an acrylic scriber or sturdy knife. Make multiple passes with firm, even pressure.
Snap quality relies on support and bend control. Put the scribe line just past a table edge. Hold the sheet firm with a board or another plastic piece. Apply sharp downward pressure to break along the line. Score the opposite face to boost snap consistency on some sheets.
Saw workflow for straight cuts in thicker sheet
Use a saw cut when thickness or shape blocks snapping. Mark the line. Clamp the sheet secure. Support both sides of the cut to cut vibration. Pick a blade for plastic cutting. General blades overheat or chip based on tooth form and spacing.
Feed rate controls saw cuts most. Keep steady motion without stops. Pause between long cuts if heat shows. If guides suggest triple-chip geometry or no-melt labels, use them as hints. Still test on scrap.
Jigsaw workflow for curves and interior shapes
A jigsaw fits curves if the blade and support stop vibration chipping. Support the sheet on backing or full area to cut chatter. Keep the shoe flat to avoid edge hops. Some setups use foam backing for stability.
Tune speed and feed to skip melting. Use variable speed if possible. Lower speed when heat rises. Keep the blade moving. Test settings on scrap before a visible edge.
Openings and circular cutouts
Openings stay clean if the workflow avoids corner stress. Drill a starter hole for jigsaw entry on interior cuts. Keep work supported near the path. Relief cuts ease binding on tight curves. They cut overheating risk.
Circular holes need tool checks. A hole saw or step bit works for some plastics. Test on scrap. Heat and grabbing vary by polymer and thickness. Clamp support is key. A grabbed hole saw can break a brittle sheet.
Edge finishing and clarity-oriented finishing
Edge finishing boosts safety and looks. It removes burrs, cuts stress whitening, and controls clarity on acrylic. A cut edge can be right in size but sharp or rough. Plan finishing with the cutting method.
Finishing sequence for most plastics
Deburr with a tool or scraper to remove fuzz and sharp edges.
Sand step by step. Use wet sanding for heat and dust control.
Buff with a pad and plastic compound when clarity matters.
Flame polishing needs strict material limits and care. It fits acrylic but not most others like polycarbonate. Practice on scrap. Too much heat causes damage or fire risk.
Troubleshooting defects with controllable variables
Troubleshooting speeds up when you link defects to variables like tooth pitch, feed rate, or support. Most defects repeat. A diagnostic table stops over-fixes that add new issues.
| Defect | Likely driver | Corrective action to verify |
|---|---|---|
| Melted edge or re-welded kerf | Dwell, excessive friction heat, wrong blade | Cut dwell, test lower speed or steady feed, add cooling pauses, check blade for no-melt label. |
| Chipped edge on acrylic | Vibration and tooth engagement too aggressive | Boost support and clamping, add tape, test plastic blade or finer action on scrap. |
| End-of-cut crack | Unsupported off-cut and late-stage snap | Support waste through final cut, cut vibration near exit. |
| Scratched face surface | Debris under sheet or film removed too early | Clean bench, keep film on acrylic, use soft jaws to avoid marks. |
| Rough, hazy acrylic edge after sanding | Incomplete grit progression or heat haze | Progress sanding, wet sand to cut heat, buff for clarity. |
Conclusion
Clean cuts in hard plastic come from heat and vibration control with the right tool and blade for the polymer and cut. A stable support plan, tested speed and feed, and set finishing method stop cracking, chipping, and melting. Keep protective steps like film on acrylic to cut cosmetic defects.
A cutting plan should finish with a check, not the first cut. Test on same polymer and thickness. It turns tips into settings for your shop and tool. This means fewer ruined sheets, safer work, and good edges.
FAQ
What is the safest way to cut hard plastic at home?
The safest approach minimizes kickback while supporting and clamping the plastic fully. For many, score-and-snap on thin acrylic or guided saw on thicker sheet beats freehand. Use PPE and ventilation if dust or fumes appear.
Should acrylic be cut differently from polycarbonate?
Acrylic cutting focuses on chip and crack prevention. Polycarbonate focuses on heat and deformation control. Acrylic gains from score-and-snap on thin sheet and vibration control on saws. Polycarbonate gains from heat tactics and limited tool pauses.
Why does plastic melt when using a jigsaw or circular saw?
Melting comes from friction heat via high speed, low feed, or pauses. A plastic blade reduces melt. Steady motion with little dwell controls it best. Scrap tests find stable combos fast.
Is flame polishing a good option for all plastics?
Flame polishing suits acrylic but not others like polycarbonate. It risks fire and damage without controlled torch motion and distance. Practice on scrap. Check polymer fit before flame use.
How can a clean edge be achieved after the cut?
A clean edge needs a sequence to remove burrs, level surface, and restore clarity if needed. Deburr or scrape fuzz. Sand irregularities. Buff acrylic for clarity. Pick finishing before cutting to minimize rework.